Getting started

How to Invite a Team Member

What you'll learn

In this guide, you'll learn how to invite team members, assign roles and permissions, manage visibility controls, and handle common issues like member limits and password resets.

Team Members and Permissions

Inviting Team Members

Only users with the Invite Members permission can invite others to a workspace. This may include Owners, Admins, or custom roles with this permission enabled.

Steps to add a member

  1. Go to Workspace Settings and click the Members tab.

  1. Click Add member

  2. Enter the Member's Email Address.

  3. Select the workspace you want to add them to.

  4. Optional: Check "Do not send invitation via email" to add the member without sending them an automatic invitation email. When this option is selected, you'll need to manually share the invitation link with the new member (see the Accepting the invitation section below).

  5. Choose the level of access:

Access Control

Admin Access

Full access to workspace settings, members, channels, and integrations. Use for owners and ops managers only.

Custom Access

Select specific permissions from General Permissions and Integration Options. Use for SDRs, BDRs, and clients.

If you grant Admin access here, the user will receive full access.

Admin login is going to be like the one that's associated with billing.

If you want to give selective access instead, choose specific permissions from General Permissions and Integration Options.

Understanding Roles & Permissions

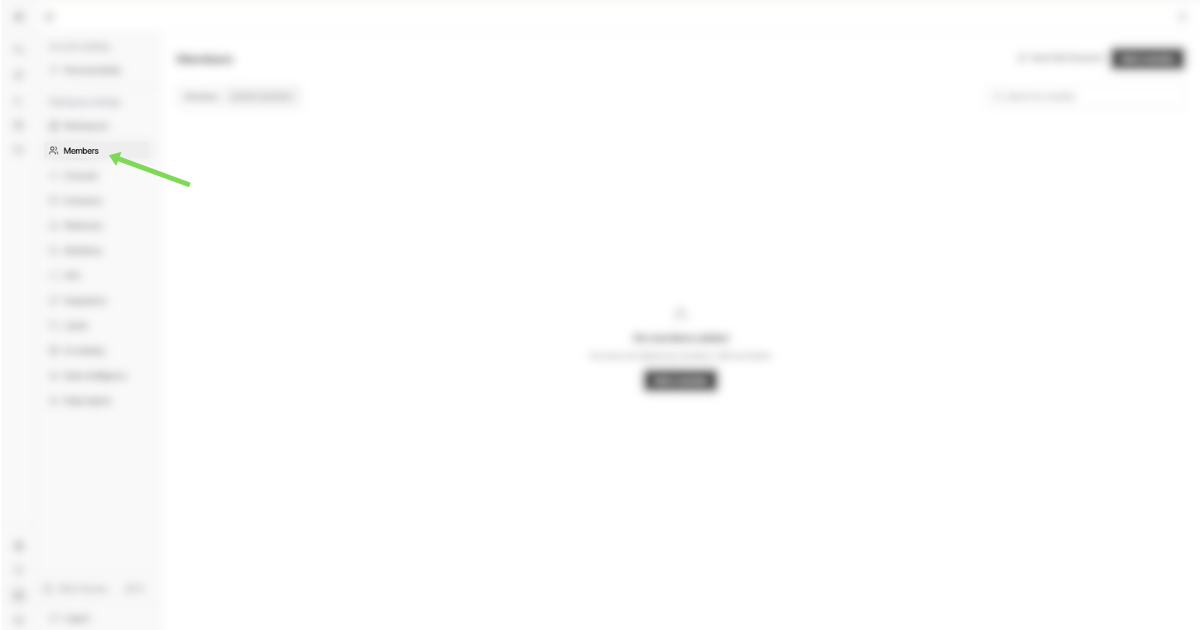
Permissions control what a user can see and do inside a workspace.

This is especially important for agencies, where clients and internal teams work together.

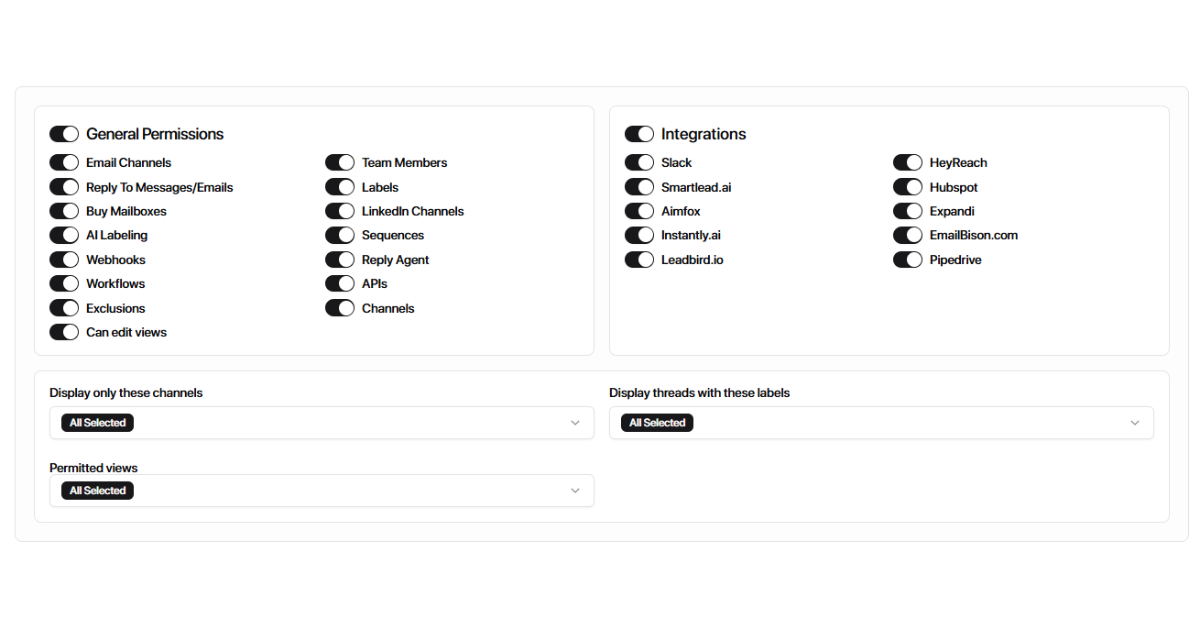
Permissions are grouped into three areas:

  1. General Permissions

  2. Integrations

  3. Visibility Controls (what the user can see)

1. General Permissions (What users can do)

These permissions control access to core product features.

Core inbox & messaging

  • Email Channels – View connected email inboxes

  • Reply to messages/emails – Send replies from the inbox

  • LinkedIn Messages – View and reply to LinkedIn conversations

  • Sequences – View or manage outbound sequences

  • Reply Agent – Access AI reply agents

Data & automation

  • Labels – Apply or manage intent labels (Interested, Follow-up, etc.)

  • AI Labeling – Configure AI-based intent classification

  • Workflows – Create automation rules

  • Webhooks – Send events to external tools

  • APIs – Developer access

Admin-level controls

  • Channels – Connect or disconnect inboxes

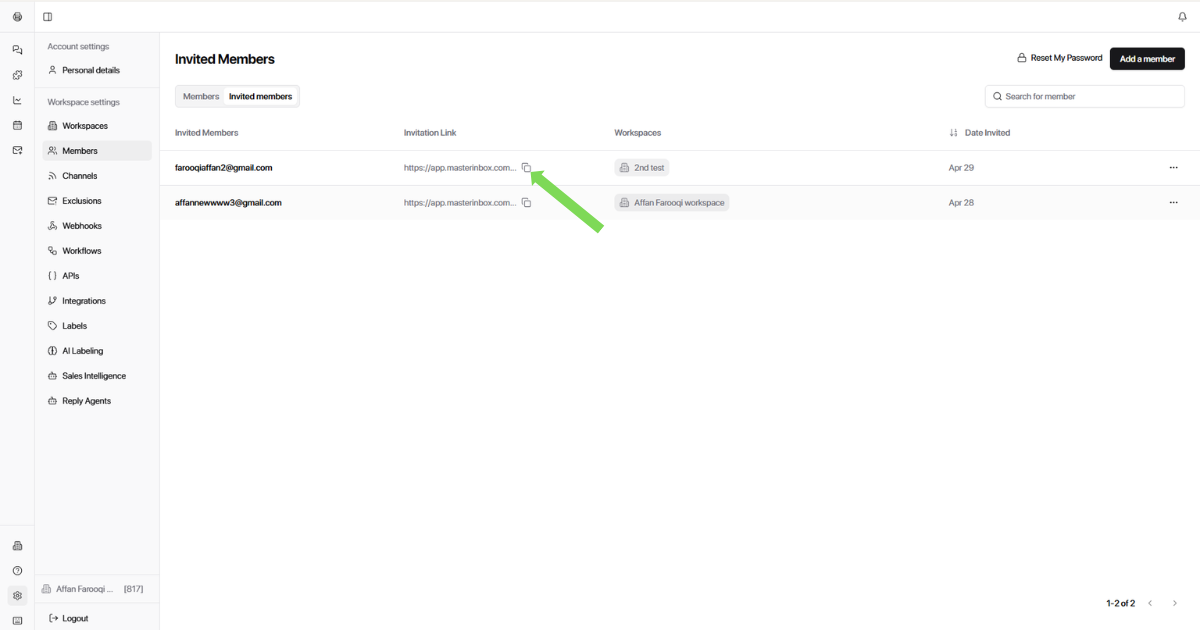
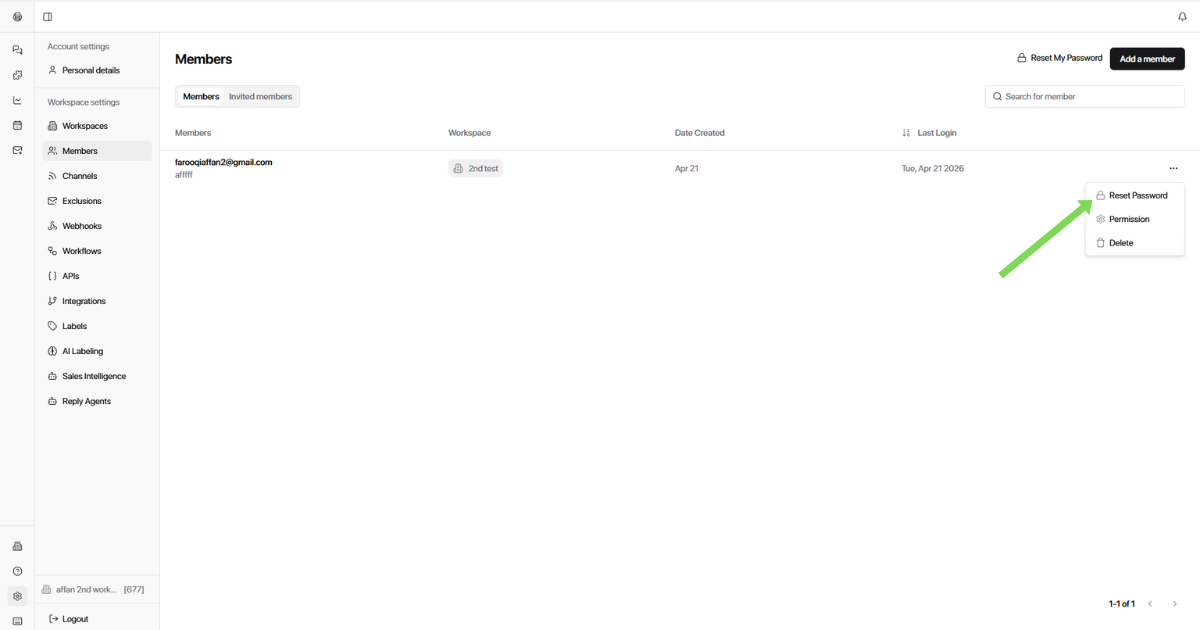
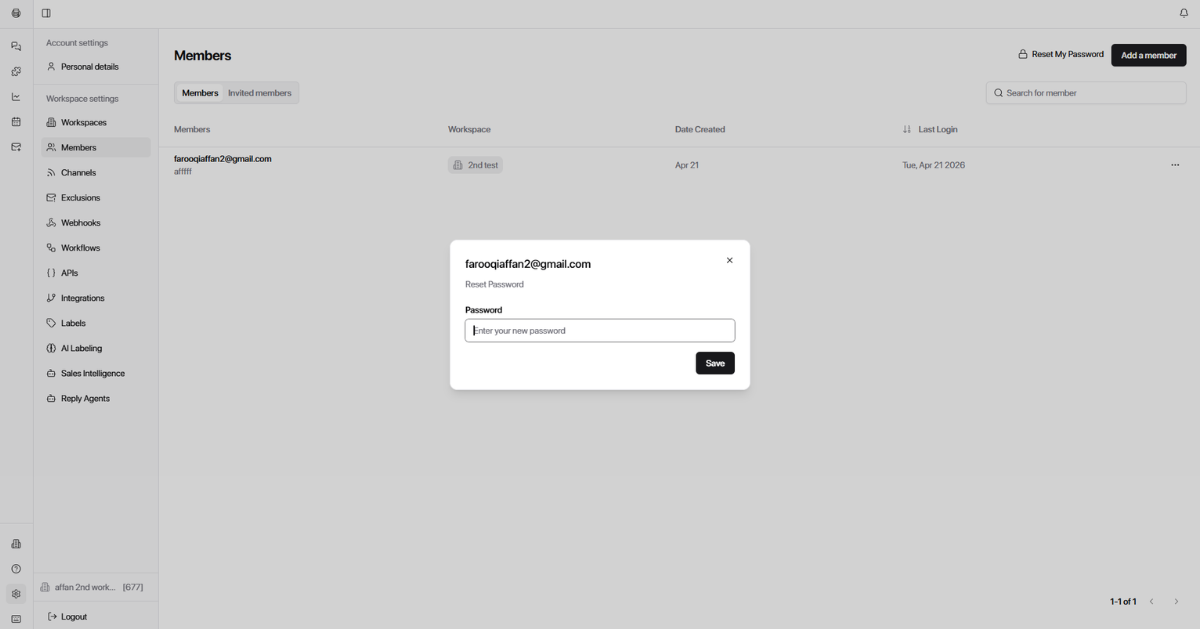
  • Team Members – Invite or manage users

  • Exclusions – Manage warmup or system exclusions

2. Integrations (What tools they can access)

These permissions control external tools connected to the workspace.

Examples:

  • Slack – Notifications & alerts

  • HubSpot – CRM sync

  • Smartlead.ai / Instantly.ai / EmailBison – Email outbound tools

  • HeyReach / Expandi / Aimfox – LinkedIn outbound tools

  • Leadbird.io – Lead enrichment

  • Google Drive – File access

Best practice: Only grant integration access to users who actually manage or monitor those tools.

3. Visibility Controls (What users can see)

These settings limit visibility without limiting functionality.

  • Display only these channels

  • Display threads with these labels

  • Permitted views

These are recommended defaults - you can customize them as needed.

Admin (Owners/Ops/RevOps)

For agency owners, operations managers, RevOps leads.
✅ All general permissions
✅ All integrations
✅ Invite and manage team members
✅ Connect and disconnect channels
✅ Full visibility across all channels, labels, and views.

Why:

Admins manage setup, integrations, automation, and reporting.

SDR (Inbound/Qualifications)

For inbound reps handling replies and qualification. ✅ Email and LinkedIn replies ✅ Labels (apply only) ✅ Reply Agent (use, not configure) ❌ No integration setup ❌ No channel or team management 🔒 Assigned channels and qualification labels only

Why:

SDRs focus on responding fast and qualifying intent, not system setup.

BDR (Outbound/Follow-Ups)

For outbound reps managing conversations and follow-ups. ✅ Email and LinkedIn replies ✅ Sequences (view) ✅ Labels (Interested, Follow-up, Objection) ❌ No integrations or workflows 🔒 Outbound-related channels only

Why:

BDRs work replies and move conversations forward — no admin access needed.

Clients (Read-only/Limited)

For clients who need visibility without risk of changes. ✅ View conversations ✅ Reply (optional, if approved) ❌ No labels, automations, or integrations ❌ No team or channel management 🔒 Restricted visibility only

Why:

Prevents accidental changes while keeping clients informed.

  1. Click Invite.

If you see a limit error when adding a member, the workspace has reached its member cap. To fix this: log out of your current account → log in as the super admin (billing account) → go to Settings → Workspace → Edit → update the member limit.

Accepting the invitation

If you selected "Do not send invitation via email" when inviting the member, follow the steps below to manually share the invitation link with them. If the email was sent automatically, the member can click the link in their email to accept.

  1. Go to the Members section inside the workspace.

  2. Open the Invited Members tab.

  3. Copy the invitation link for the pending user.

  1. Open the invitation link in an incognito (private) window.

  1. Accept the invite on behalf of the member.

  1. Set up the login credentials and share the email + password securely with the client.

Once accepted, the user will appear under Members and can access the workspace immediately.

How to Reset a Member's Password

When to Reset a Password

You may need to reset a member's password if:

  • A team member forgot their password

  • Access needs to be secured

  • A role or responsibility has changed

Only workspace admins can reset member passwords.

Best Practices

  • Share the new password securely (avoid public channels).

  • Ask the member to change their password after logging in.

  • Reset passwords immediately if access should be restricted.

Steps to Reset a Member's Password

  1. Go to Settings.

  2. Click on Members.

  3. Select the member account you want to reset the password for.

  4. Click Reset Password.

  1. Enter the new password.

  1. Save the changes.

    Share the new password securely — avoid public channels like Slack or email threads. Ask the member to update their password after first login. Reset passwords immediately if access needs to be restricted

The password resets immediately. The member can log in using the new credentials right away.

Frequently Asked Questions

What is a workspace in Master Inbox?

A workspace represents one team or one client in Master Inbox. Agencies typically create separate workspaces for each client to keep conversations, channels, and team members organized. Internal teams usually create one workspace per team. Each workspace has its own members, channels, labels, views, and permission settings, allowing you to isolate client data and control who can see what.

Can a team member belong to multiple workspaces?

Yes, a single user can be invited to multiple workspaces. However, they need to be added separately to each workspace, and their permissions can be different in each one. This is useful for agency staff who work across multiple client accounts or team members who support different teams.

Can I invite someone to multiple workspaces at once?

No, each workspace invitation is separate. You need to invite the member individually to each workspace they should access. This allows you to set different permissions and visibility for each workspace, which is useful when a team member works across multiple clients or teams with different access requirements.

Can I change a member's permissions after they've been invited?

Yes. Workspace admins can modify a member's permissions at any time. Go to Workspace Settings → Members, select the member, and update their access level or individual permissions. Changes take effect immediately.

How do I remove a team member from a workspace?

Go to Workspace Settings → Members, find the team member you want to remove, and use the remove or delete option. This revokes their access to that specific workspace. If they belong to other workspaces, their access to those remains unchanged.

What happens when I move a channel to another workspace?

Moving a channel to another workspace does not automatically move member access. Members who had access to the channel in the original workspace will not automatically see it in the new workspace. You need to invite them to the destination workspace separately or adjust permissions there.

What is the difference between a workspace owner and an admin?

A workspace owner is typically the billing account holder who created the workspace. They have full control over the workspace and can manage subscription settings, increase member limits, and access billing information. An admin has full access to workspace settings, members, channels, and integrations but may not have access to billing or subscription changes unless they are also the billing account owner.

Can I temporarily disable a team member's access without removing them?

To stop a member's access, you need to remove them from the workspace. If you want to restore their access later, you can re-invite them. Their previous permissions and visibility settings will need to be configured again.

How do I promote a member to admin?

Go to Workspace Settings → Members, select the member you want to promote, and change their access from Custom Access to Admin Access. This grants them full access to workspace settings, members, channels, and integrations immediately. Only existing admins or owners can promote members.

Can I set different permissions for the same member across different workspaces?

Yes. Since each workspace invitation is separate, you can configure different access levels and visibility controls for the same user in each workspace. For example, you could give someone Admin Access in one workspace but limited Client-style access in another, depending on their role for that specific client or team.

Do workspace owners count against the member limit?

Yes, workspace owners are counted as members and contribute to the workspace's member limit. The member limit includes all users with access to the workspace, regardless of their role or permission level.

Can I transfer workspace ownership to another member?

Workspace ownership is tied to the billing account. To transfer ownership, you would typically need to transfer the billing account or contact Master Inbox support. Simply giving someone Admin Access does not make them the workspace owner.

How do I switch between workspaces as a team member?

If you belong to multiple workspaces, you can switch between them using the workspace selector in Master Inbox. This lets you view and respond to conversations in each workspace independently. Your permissions may differ between workspaces, so some features may be available in one workspace but not another.

Can I see which team members have access to a specific channel?

Master Inbox uses visibility controls rather than per-channel access lists. To see who can view a channel, check each member's visibility settings in Workspace Settings → Members. Members with restricted visibility will only see the channels configured in their "Display only these channels" setting.

What should I do if a team member leaves the company?

Remove the team member from all workspaces they had access to by going to Workspace Settings → Members in each workspace. This immediately revokes their access. If they knew their password, consider resetting passwords for any shared accounts they may have had access to, and review any integrations they managed to ensure nothing is disrupted.

Can I require two-factor authentication for team members?

Two-factor authentication settings are managed at the account level, not the workspace level. Check Master Inbox's security settings or contact support for current options regarding enforcing 2FA for workspace members.

How do I export a list of all workspace members?

Currently, Master Inbox does not have a built-in export feature for member lists. You can view all members in Workspace Settings → Members and manually document the list if needed for auditing or administrative purposes.

Can I clone a workspace's member setup to another workspace?

No, member invitations and permissions must be configured separately for each workspace. If you need similar member setups across multiple workspaces, document your standard permission templates and apply them manually when inviting members to new workspaces.

What happens to a member's conversations if I remove them?

Conversations remain in the workspace when a member is removed—they are not deleted or reassigned. Any replies or notes the member made stay in the conversation history. Other workspace members with access to those channels can continue managing the conversations.

Can I invite someone as a viewer only with no reply permissions?

Yes. When configuring Custom Access, you can grant view conversations permission without granting reply to messages/emails or LinkedIn Messages reply permissions. This creates a read-only member who can monitor conversations but cannot send responses—useful for managers or stakeholders who need visibility without intervention.

Was this helpful?