Master Inbox supports four channel types: Google (Gmail/G-Suite), Outlook (Office 365), LinkedIn, and Custom IMAP/SMTP. All channels are unified into a single conversation view within your workspace.
How to Add a Channel & Auto CC/BCC
What you'll learn
In this guide, you'll learn how to add channels to your workspace, connect different sender types, troubleshoot Microsoft 365 consent issues, bulk upload mailboxes as an agency, move channels between workspaces, and set up Auto CC/BCC rules.
What is a Channel
A connected sending account (email or LinkedIn) that allows Master Inbox to send, receive, and manage conversations from that identity.
It represents who messages are sent from.
It’s not just “for replies.” It’s the actual communication account you connect.
Steps to add a channel
Go to the settings icon in the bottom right corner
Click on the Channels tab.
Select Add Channel.

Choose the channel type.
Channel Type You Can Add
Master Inbox supports multiple channel types, all unified into a single conversation view.
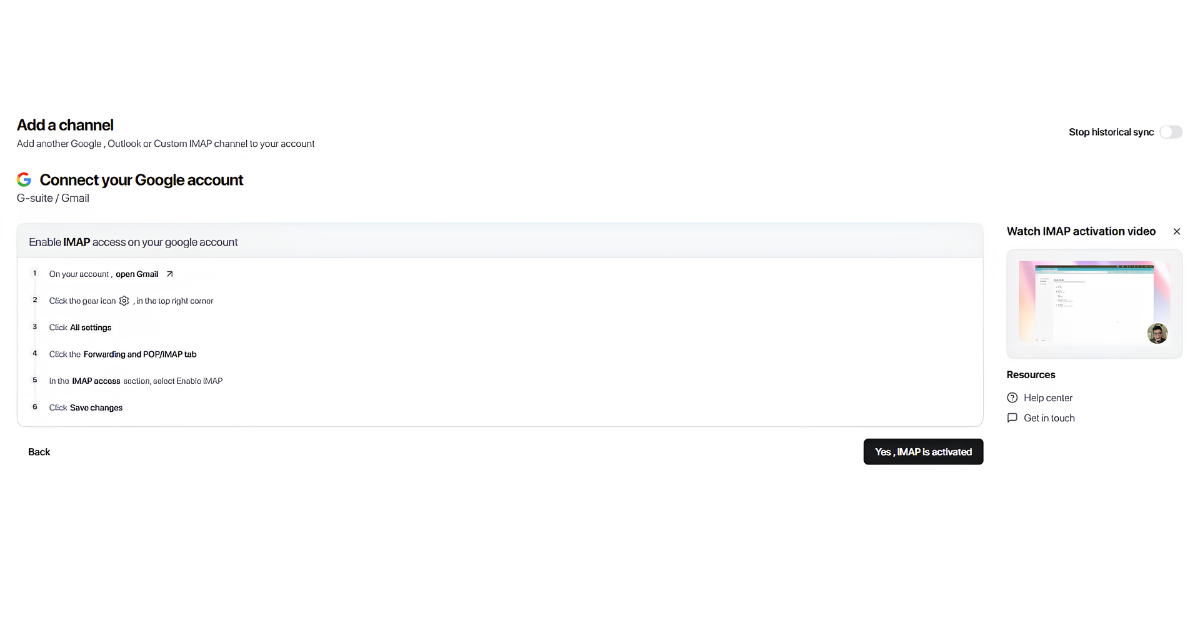
Google (Gmail/G-Suite)
Connect Gmail or Google workspace accounts to read and send replies automatically.
Outlook (Office 365)
Connect Microsoft Outlook or Office 365 to sync replies in real time
Connect your LinkedIn account by adding your credentials directly.
Connect your LinkedIn account by adding your credentials
Custom IMAP/SMTP
Connect any custom email provider. Required for Zoho, GoDaddy, Namecheap, and private mail servers.
LinkedIn in MasterInbox works differently from tools like HeyReach or Lemlist. MasterInbox connects to real, direct LinkedIn conversations, not campaign-based inboxes.
What this means:
Messages come directly from real LinkedIn accounts
Conversations are 1:1 connections on LinkedIn
Replies sync exactly as they appear on LinkedIn
No automation or sequencing layer is used for LinkedIn
It connects and syncs via a secure third-party LinkedIn API
Master Inbox uses a secure third-party LinkedIn API to connect and sync these conversations.

How Email Connections Work
IMAP Reads incoming replies so Master Inbox can detect and sync messages into your workspace.
SMTP Sends outgoing replies when you respond directly from Master Inbox.
If a channel disconnects, incoming replies may stop syncing, which can result in missed leads or delayed responses. Check your channel status regularly.
What Happens If a Channel Disconnects?
Incoming replies may stop syncing
This can result in missed leads or delayed responses.
Microsoft 365 Consent and Admin Approval
When you connect Microsoft 365 (Outlook) mailboxes, each new mailbox may create a separate Enterprise Application in your Microsoft tenant. This is expected behavior for how Master Inbox integrates with Microsoft 365.
Why You See Repeated Admin Approval Prompts
If your Microsoft 365 organization requires admin approval for third-party apps, you may see an admin consent prompt each time you connect a new mailbox. This happens because each mailbox connection registers as a new app instance in your Microsoft tenant.
If you've already approved one mailbox but see another approval prompt for a new mailbox, this means a new Enterprise Application has been created for that connection.
How to Resolve Repeated Consent Prompts
If you're seeing repeated admin approval prompts for each new Microsoft 365 mailbox:
Contact support to get the list of Master Inbox app IDs registered in your Microsoft tenant.
Grant admin consent for each listed app ID in your Microsoft Entra admin center (formerly Azure AD).
Verify the correct account is connected after approval — the mailbox that appears in Master Inbox should match the tenant user account, not the Microsoft admin account used to approve the app.
Removing Incorrect Admin Accounts
If an admin approval accidentally connected a Microsoft admin account instead of the intended tenant mailbox:
Go to Settings → Channels.
Remove the incorrect channel.
Reconnect the correct mailbox using the intended email address.
To avoid repeated prompts, ask your Microsoft 365 admin to pre-approve all Master Inbox app IDs before connecting additional mailboxes.
What to Do If Prompts Continue
If admin approval prompts continue after granting consent to all listed app IDs:
Check that consent was granted at the organization level, not just for a single user.
Verify you're connecting mailboxes from the same Microsoft tenant.
Contact Master Inbox support with your Microsoft tenant ID for further assistance.
Bulk Uploading Mailboxes
This is for agencies managing multiple clients or 10+ mailboxes. Bulk integration lets you connect multiple sender accounts at once instead of adding them one by one.
This is especially useful when you:
Manage multiple clients
Onboard new campaigns frequently
Handle 10+ mailboxes or LinkedIn accounts
Want consistent labeling and permissions across accounts
Steps to bulk upload:
How to Bulk Upload Mailboxes
Steps:
Choose the correct provider
When bulk uploading Google or Outlook mailboxes, select the provider:
Hypertide – Outlook
This provider supports both Google and Outlook mailboxes during bulk import.
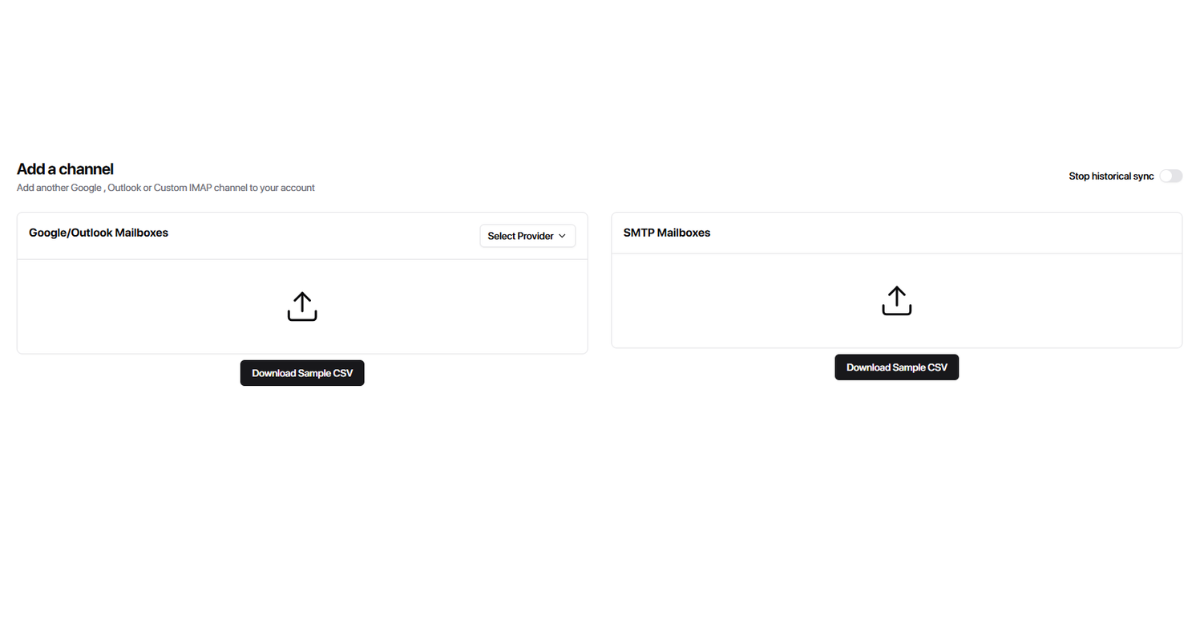
Download the sample CSV
Download the sample CSV file for the type of mailboxes you’re adding:
Google / Outlook Mailboxes
SMTP Mailboxes
Each sample CSV includes:
The required column structure
The correct formatting for each field
Fill in the CSV (do not change the format)
Enter your mailbox details exactly in the same format as the sample file.
Important guidelines:
Do not rename columns
Do not add extra columns
One row = one sender mailbox
Double-check passwords and credentials
Ensure 2FA is disabled where required
Upload the completed CSV
Once your CSV is ready:
Upload the file in the bulk import section
Start the import
Wait for the system to validate and connect the mailboxes
Any errors will be shown so you can fix them before retrying.
Agency best practices:
Upload mailboxes client by client to avoid mix-ups
Use naming conventions in your CSV for easier tracking
Test with 2–3 mailboxes first before uploading at scale
Assign labels and permissions after a successful import
Connect it using the required credentials.
Once connected, the channel will start syncing replies into the workspace automatically.
Move Channels Between Workspaces
If you need to reorganize channels across workspaces—for example, moving a client's mailboxes to their own dedicated workspace—you can move channels in bulk from the Channels settings.
Before You Move
The destination workspace must already exist. If you need to create a new workspace first, see How to Add a Workspace.
Check workspace limits. Each workspace has independent limits for emails (connected inboxes), members, and LinkedIn accounts. The destination workspace must have available capacity for the channels you're moving. If you're at capacity, you'll need to increase the workspace limits first—this requires super admin (billing account) access.
Plan your batches. For optimal processing performance, move channels in batches of about 50 at a time. Moving larger batches at once may slow down processing or cause delays.
Steps to Move Channels
Go to Settings.
Go to Channels.
Select the channels you want to move.
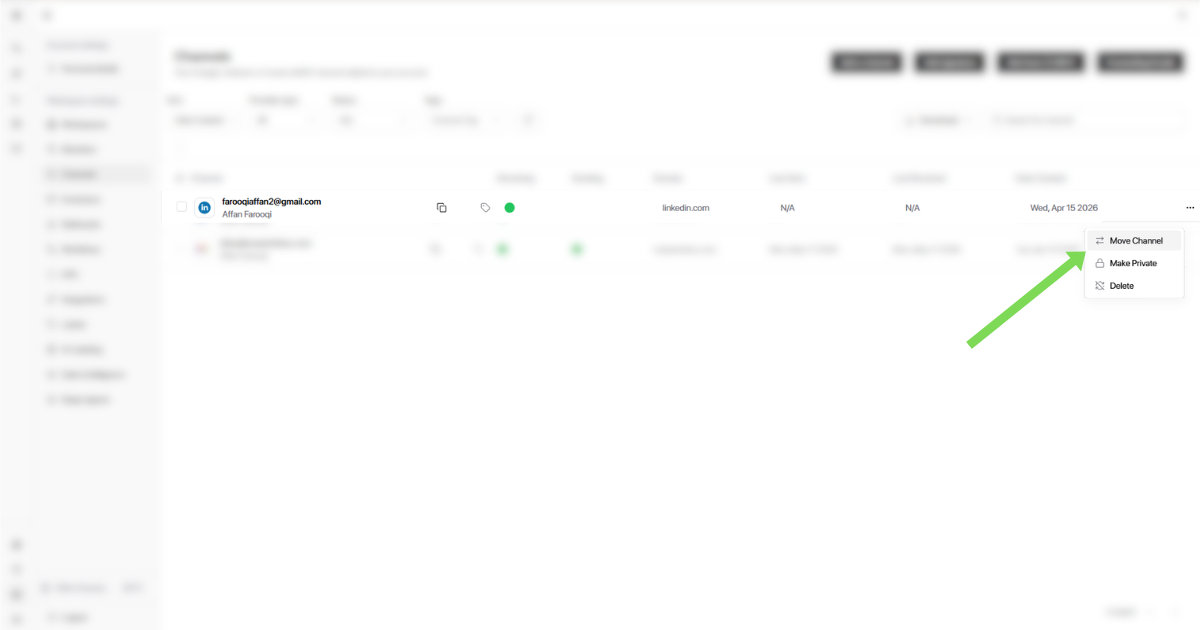
Click the three dots (⋮) menu.
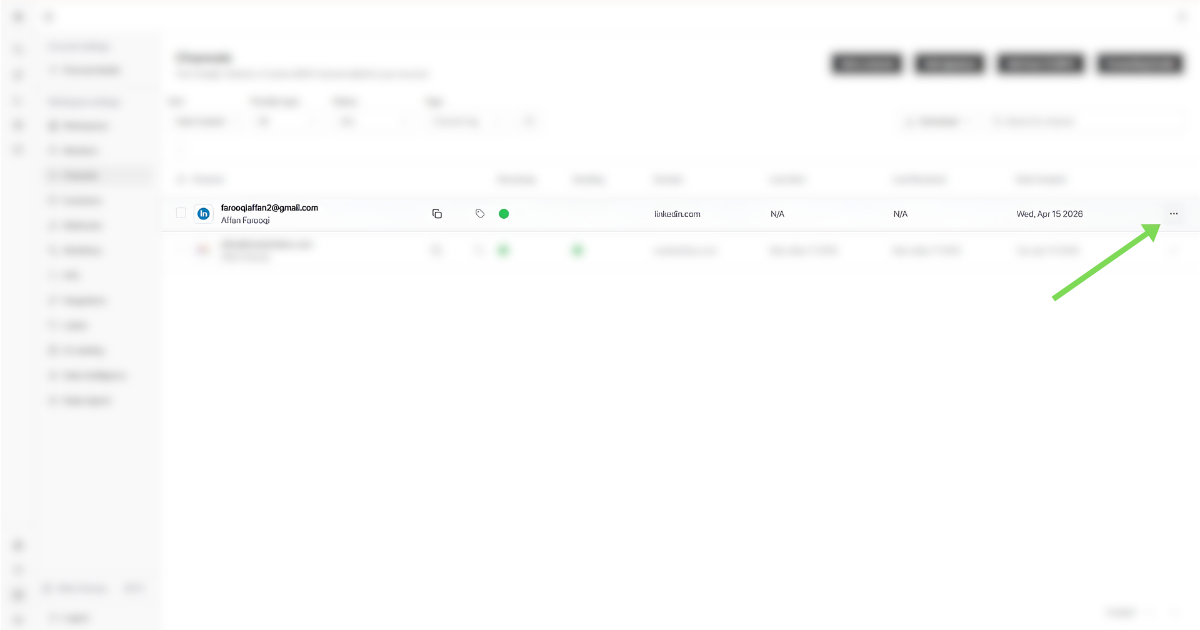
Click Move Channels.
Select the destination workspace from the dropdown.

Confirm the move and wait for the channels to process.
What Happens During Processing
After you confirm the move:
The selected channels are transferred to the destination workspace.
Processing time depends on the number of channels being moved. Moving in batches of ~50 helps keep this fast.
Once complete, the channels will appear under the new workspace in your Channels list.
Workspace access: After the move, team members who had access to the source workspace will not automatically have access to the destination workspace. Make sure to invite the right team members to the destination workspace if needed. See How to Invite a Team Member.
Troubleshooting: Moved Channels Don't Appear
If you've moved channels to a new workspace but can't see them, work through these checks:
1. Wait for processing to complete
Channel moves are not instant. Processing time depends on how many channels you moved:
Small batches (~50 channels): Typically complete within a few minutes
Large batches: May take longer—refresh the page after a few minutes to check status
Refresh your Channels list to the destination workspace to see if the channels have appeared.
2. Verify the destination workspace exists
You can only move channels to an existing workspace. If the destination workspace was deleted or never created, the move will fail silently.
Check that you're looking in the correct workspace by switching to it in the bottom-left corner of the app.
3. Check workspace capacity
The destination workspace must have available capacity for the channels you're moving. If the workspace is at its limit:
Only a super admin can increase workspace limits
Go to Settings → Workspaces → Edit on the destination workspace
Increase the Emails or LinkedIn Accounts limit as needed
If you're not the super admin, contact your billing account owner.
4. Verify you're in the right workspace
After a move, channels appear in the destination workspace—not the source. Switch to the destination workspace using the workspace selector in the bottom-left corner.
5. Check member access
If your team members can't see the moved channels, this is expected:
Moving channels does not automatically move member access
Members who had access to the source workspace won't automatically see the destination workspace
Invite them to the destination workspace separately
6. Still not appearing?
If you've confirmed all of the above and channels still don't appear:
Verify the move was confirmed—check for any error messages
Try moving a smaller batch (10–20 channels) to test
Contact support with the source and destination workspace IDs
How to Add Auto CC/BCC
Auto CC/BCC automatically adds specific email addresses to every outgoing reply from selected channels, without you having to manually CC anyone.
This is useful when you want to:
Keep clients in the loop on conversations
Loop in account managers or team leads
Maintain visibility without manual CC’ing every time
Log conversations in shared inboxes or CRMs
Once set up, you don’t need to remember to CC or BCC anyone - it happens automatically.
Steps to Add Auto CC / BCC
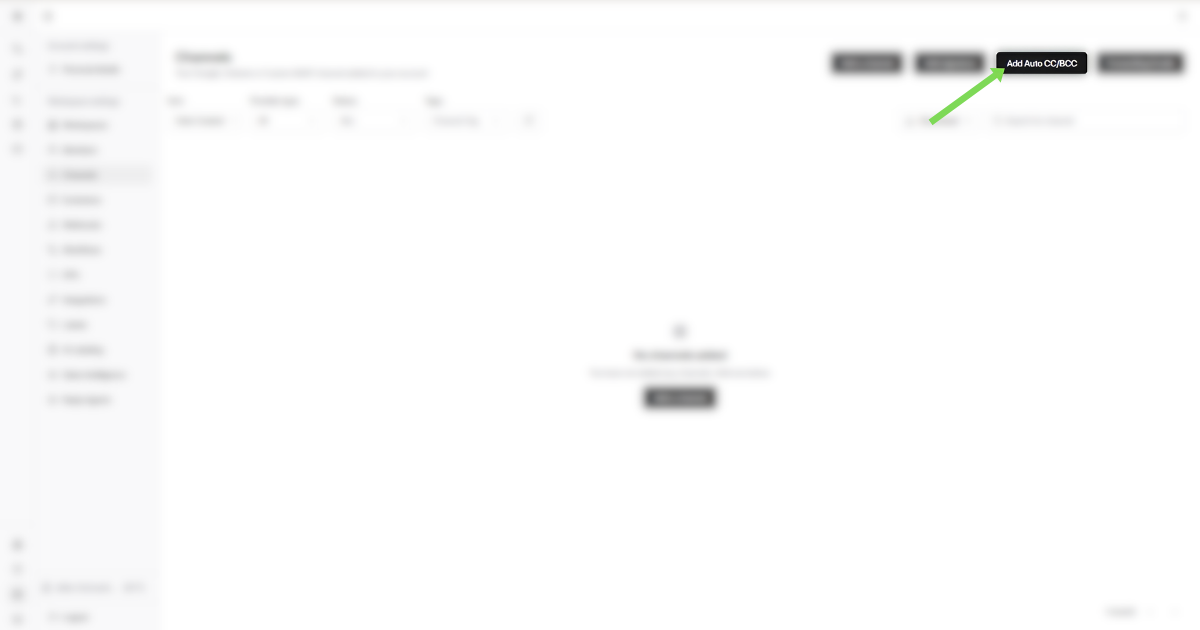
Go to Settings → Channels
Click Add Auto CC / BCC.
Enter a name for this rule
(e.g. "Client Visibility" or "Internal Team CC").Select the channels where this rule should apply
(Google, Outlook, or specific inboxes).
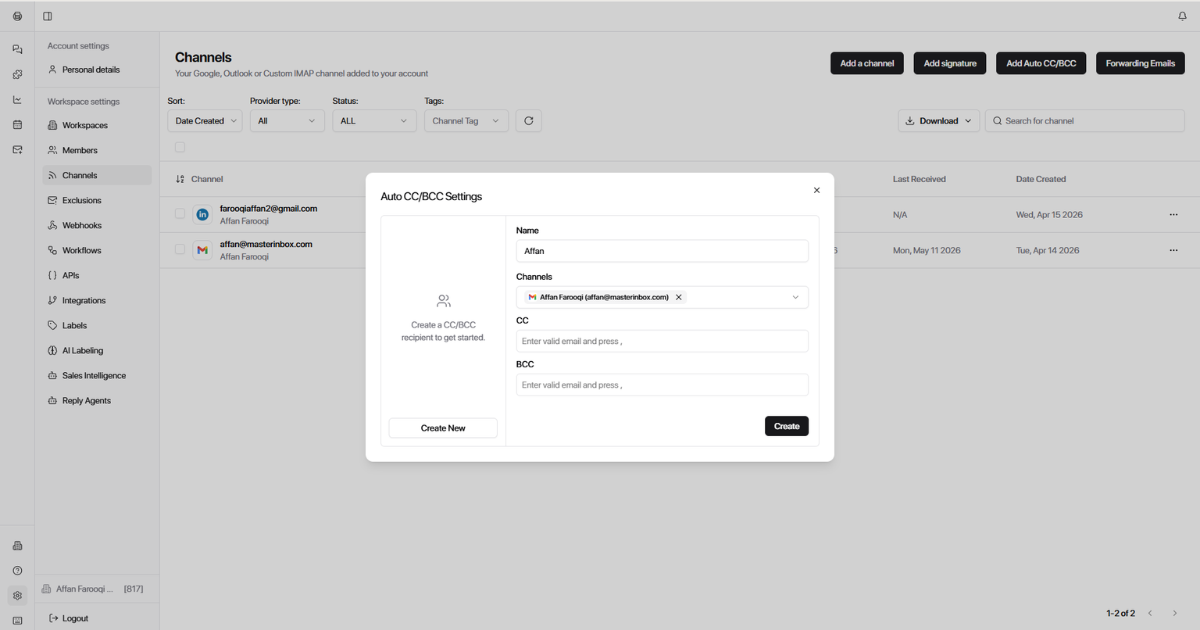
Add the email addresses you want to:
CC (visible to recipients)
BCC (hidden from recipients)
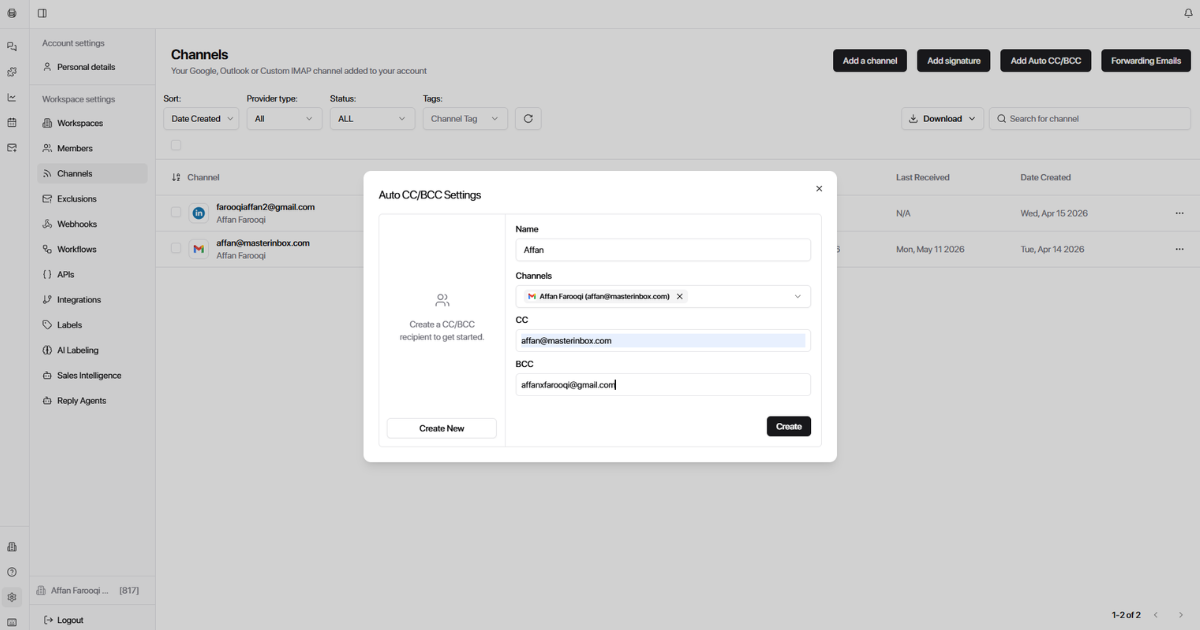
Save the configuration.
That's it! All outgoing replies from the selected channels will now automatically include these emails.
Frequently Asked Questions
What channel types are supported?
How do I connect a Gmail or Google Workspace account?
Go to Workspace → Channels → Add Channel, then select Google as the channel type. Follow the authentication flow to connect your Gmail or Google Workspace account. Once connected, Master Inbox can read incoming replies and send outgoing messages from that account.
How do I connect an Outlook or Office 365 account?
Go to Workspace → Channels → Add Channel, then select Outlook as the channel type. Follow the Microsoft authentication flow to connect your Outlook or Office 365 account. This allows Master Inbox to sync replies in real time.
How does LinkedIn integration work in Master Inbox?
LinkedIn in Master Inbox connects to real, direct LinkedIn conversations—not campaign-based inboxes. Messages come directly from real LinkedIn accounts, conversations are 1:1 connections on LinkedIn, and replies sync exactly as they appear on LinkedIn. Master Inbox uses a secure third-party LinkedIn API to connect and sync these conversations.
Does LinkedIn support automation or sequencing?
No. Master Inbox's LinkedIn integration does not include an automation or sequencing layer. It connects and syncs real 1:1 LinkedIn conversations. For outbound sequencing, you would use a separate sending tool; Master Inbox handles the reply management side.
What is the difference between IMAP and SMTP?
IMAP reads incoming replies so Master Inbox can detect and sync messages into your workspace. SMTP sends outgoing replies when you respond directly from Master Inbox. Both are required for full email functionality.
How do email connections work in Master Inbox?
Master Inbox uses IMAP to read incoming replies and SMTP to send outgoing messages. When you connect an email channel, both protocols are configured so you can receive replies in your workspace and respond directly without leaving Master Inbox.
What happens if a channel disconnects?
If a channel disconnects, incoming replies may stop syncing. This can result in missed leads or delayed responses. Regularly check your channel status to ensure all connections remain active.
How can I check if my channel is connected?
Go to Settings → Channels to view the status of all connected channels. Each channel displays its current connection status. If a channel shows as disconnected, you'll need to reconnect it to resume syncing.
What is bulk mailbox uploading?
Bulk mailbox uploading allows agencies to connect multiple sender accounts at once using a CSV file instead of adding them one by one. This is designed for teams managing multiple clients, onboarding new campaigns frequently, or handling 10+ mailboxes or LinkedIn accounts.
When should I use bulk upload instead of adding channels manually?
Use bulk upload when you manage multiple clients, onboard new campaigns frequently, handle 10+ mailboxes or LinkedIn accounts, or want consistent labeling and permissions across accounts. For just a few channels, manual addition may be faster.
How do I bulk upload mailboxes?
Steps:
Choose the correct provider (Google, Outlook, or SMTP).
Download the sample CSV file for your mailbox type.
Fill in the CSV with your mailbox details, keeping the exact format.
Upload the completed CSV in the bulk import section.
Start the import and wait for validation.
What should I include in the CSV file for bulk upload?
Each row represents one sender mailbox. Include all required credentials such as email addresses, passwords, and server details for IMAP/SMTP. Do not rename columns, do not add extra columns, and ensure 2FA is disabled where required. Double-check all passwords and credentials before uploading.
What are common mistakes to avoid during bulk upload?
Common mistakes include: renaming columns in the CSV, adding extra columns, incorrect passwords or credentials, having 2FA enabled on accounts that require it to be disabled, and mixing up mailboxes between clients. Always test with 2–3 mailboxes first before uploading at scale, and upload client by client to avoid mix-ups.
Can I upload both Google and Outlook mailboxes together?
Yes. The Hypertide – Outlook provider supports both Google and Outlook mailboxes during bulk import. Select this provider when uploading a mixed batch of mailboxes.
What happens if there are errors during bulk upload?
Any errors will be displayed after the import attempt so you can identify and fix them before retrying. Common errors include incorrect credentials, wrong column formatting, or accounts with 2FA enabled.
Can I move channels between workspaces?
Yes. You can move channels in bulk from the Channels settings. This is useful for reorganizing channels across workspaces, such as moving a client's mailboxes to their own dedicated workspace.
How do I move channels to another workspace?
Steps:
Go to Settings → Channels.
Select the channels you want to move.
Click the three dots (⋮) menu.
Click Move Channels.
Select the destination workspace from the dropdown.
Confirm the move and wait for processing.
What should I check before moving channels?
Before moving channels, ensure: (1) The destination workspace already exists, (2) The destination workspace has available capacity for the channels you're moving, and (3) You're moving in batches of about 50 at a time for optimal performance. If capacity is insufficient, you'll need super admin access to adjust limits.
Why can't I see the destination workspace when moving channels?
The destination workspace must exist before you can move channels to it. Create the workspace first, then return to the move flow. You can create a new workspace from the Workspace settings.
What happens after channels are moved to another workspace?
The selected channels are transferred to the destination workspace. Processing time depends on the number of channels being moved. Once complete, the channels will appear under the new workspace in your Channels list.
Do team members keep access after channels are moved?
No. Team members who had access to the source workspace will not automatically have access to the destination workspace. You'll need to invite the right team members to the destination workspace separately.
The move seems stuck or channels aren't appearing
If the move is taking longer than expected:
Refresh the page to check the current status.
Verify you moved a manageable batch size (~50 channels).
Check that the destination workspace has available email capacity.
I can't update workspace limits for the destination
Only the super admin (billing account) can update workspace limits. If you're logged in as a basic admin on a client account, you won't see the full workspace settings. Log in with the super admin account to adjust limits.
What is Auto CC/BCC?
Auto CC/BCC automatically adds specific email addresses to every outgoing reply from selected channels, without you having to manually CC anyone. Once set up, it happens automatically on every reply.
Why should I use Auto CC/BCC?
Use Auto CC/BCC to: keep clients in the loop on conversations, loop in account managers or team leads, maintain visibility without manually CC'ing every time, or log conversations in shared inboxes or CRMs.
How do I set up Auto CC/BCC?
Steps:
Go to Settings → Auto CC / BCC.
Click Add Auto CC / BCC.
Enter a name for the rule.
Select the channels where the rule should apply.
Add the email addresses for CC (visible) or BCC (hidden).
Save the configuration.
What is the difference between CC and BCC?
CC recipients are visible to all email recipients—they can see who was copied on the message. BCC recipients are hidden from recipients—they receive a copy without anyone knowing they were included.
Can I apply Auto CC/BCC to specific channels only?
Yes. When setting up an Auto CC/BCC rule, you select which specific channels it applies to. This allows you to have different rules for different clients, teams, or inbox types.
Will Auto CC/BCC apply to all outgoing messages automatically?
Yes. Once configured, all outgoing replies from the selected channels will automatically include the CC/BCC email addresses. You don't need to remember to add them manually each time.
Why do I keep seeing admin approval prompts for Microsoft 365 mailboxes?
Each new Microsoft 365 mailbox may create a separate Enterprise Application in your Microsoft tenant. If your organization requires admin approval for third-party apps, you'll see a consent prompt for each new app instance. To resolve this, contact support to get the list of Master Inbox app IDs, then grant admin consent for each in your Microsoft Entra admin center. For full steps, see the Microsoft 365 Consent and Admin Approval section above.
Was this helpful?