A workspace represents one team or one client in Master Inbox. It acts as a container that holds all related inboxes, team members, LinkedIn accounts, views, labels, and settings. Agencies typically create one workspace per client, while internal teams create one workspace per sales or GTM team.
How to Add a Workspace
What you’ll learn
In this guide, you’ll learn how to create, manage, clone, and switch workspaces in Master Inbox. Workspaces help you organize teams, clients, and inboxes without overlap.
What is Workspace
A workspace represents one team or one client.
Agencies can create one or multiple workspaces per client, while internal teams create one workspace per team.
Steps to create a workspace:
Click the Settings icon in the bottom-right corner.
Click on the Workspaces under the Workspace Settings.
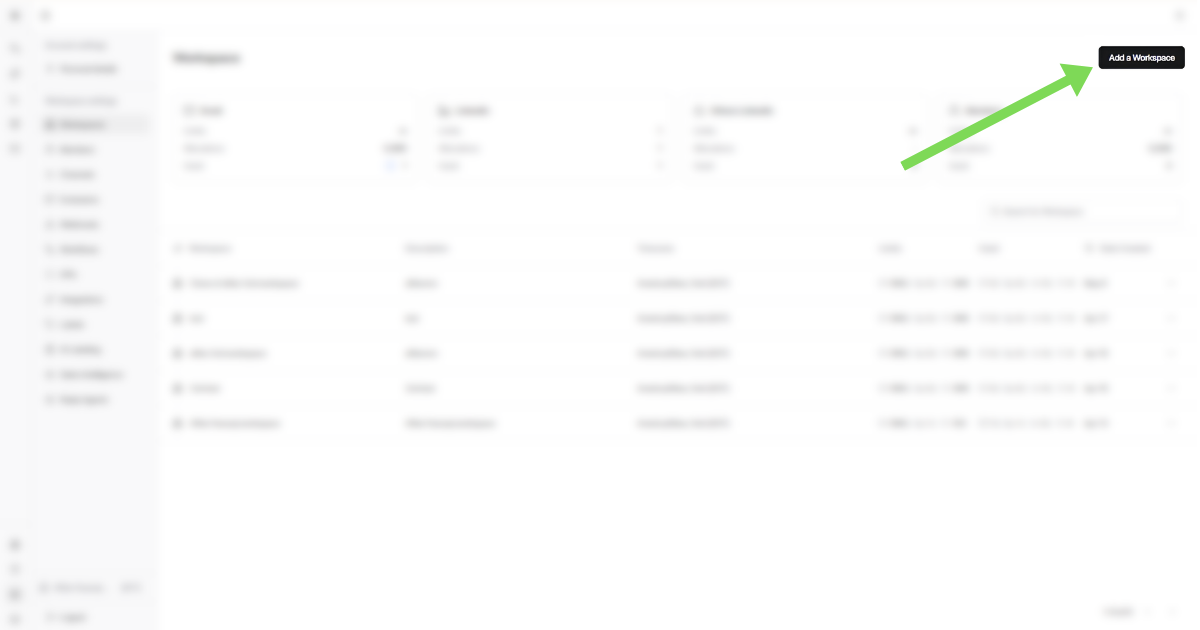
Click Add Workspace.
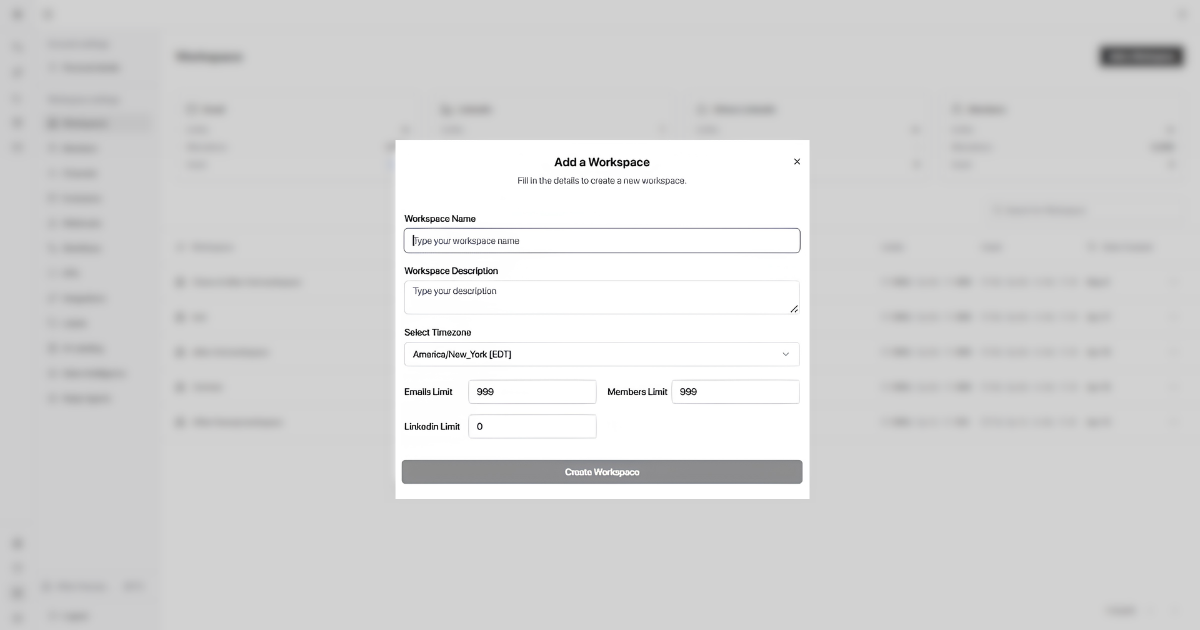
Enter the Workspace Name and Description
Example (Agency): Acme Inc – Outbound
Example (Internal Team): Sales – US Market
Choose the time-zone.
The timezone is set once by the workspace owner and applies to all users. It affects timestamps, reminders, follow-ups, and reporting.
Set limits for:
Emails → How many sender inboxes can be connected
Members → How many users can access this workspace
LinkedIn Accounts → How many LinkedIn senders can be connected
LinkedIn limits don't apply to Heyreach or API based LinkedIn integrations and only apply to direct LinkedIn integrations.
Understanding Workspace Limits
How do I update these limits? Go to Settings → Workspaces → Edit → update the limits as needed. You must be logged in as the super admin (billing account) to update limits.
Do clients get their own limits? Yes! Each client account has its own independent pool of email slots, separate from your account and other clients.
Can't find Workspace Settings or update limits? This usually means you're logged into a client account where you're only a basic admin, not the super admin.
If you're the super admin → you'll see full workspace settings and can update limits freely
If you're a basic admin (e.g. logged into a client account) → log out and log back in with the super admin account (the billing account) to make changes.
Click Create.
You're all set! Your workspace is now created. You can start adding team members, connecting sender inboxes, and linking LinkedIn accounts, all within the limits you configured.
Best Practices
Agencies: Create one workspace per client to avoid mixing conversations and reporting.
Internal Teams: Create one workspace per sales or GTM team.
Limits: These help you control access and prevent inbox overlap as you scale.
How to Clone a Workspace
Cloning lets you reuse a proven setup without rebuilding workflows.
Instead of manually recreating views, labels, and automations, you can reuse a proven setup in seconds. This is especially useful for agencies managing multiple clients or teams. You're cloning the structure and rules, not the messages.
Best Use Cases
For Agencies
Spin up a new client workspace using a proven template
Standardize workflows across all clients
Save hours during onboarding
For SDR / BDR Teams
Clone high-performing workflows for new team members
Keep inbox rules consistent across regions or segments
For Clients
Separate pipelines by product, brand, or region
Maintain clean reporting without rebuilding logic
Best Practices
Create a "Template Workspace" for cloning
Keep client-specific labels separate from global ones
Review webhooks and integrations after cloning
Rename the workspace clearly (Client Name / Campaign / Region)
Steps to Clone a Workspace
Go to Settings.
Navigate to Workspaces.
Find the workspace you want to duplicate.
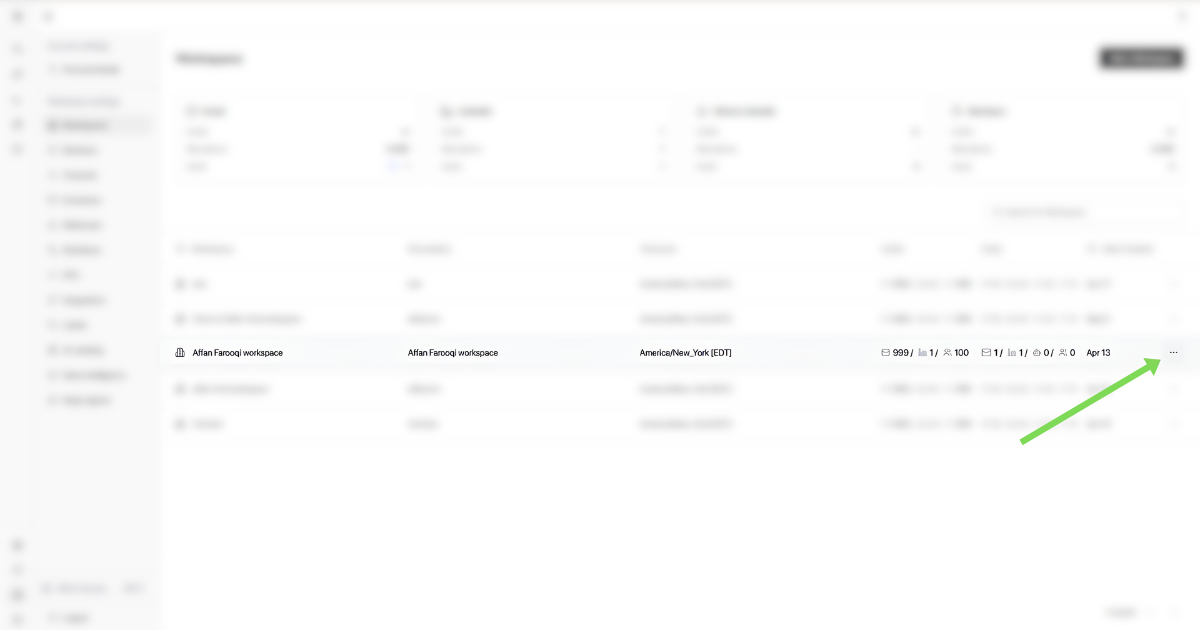
Click the three dots (⋮) next to the workspace name.
Click Clone.
Enter a new workspace name.
Select what you want to clone:
Views
Labels
Webhooks
Inbox Types / Lists
Exclusions
AI Labels
Reply agents
Templates
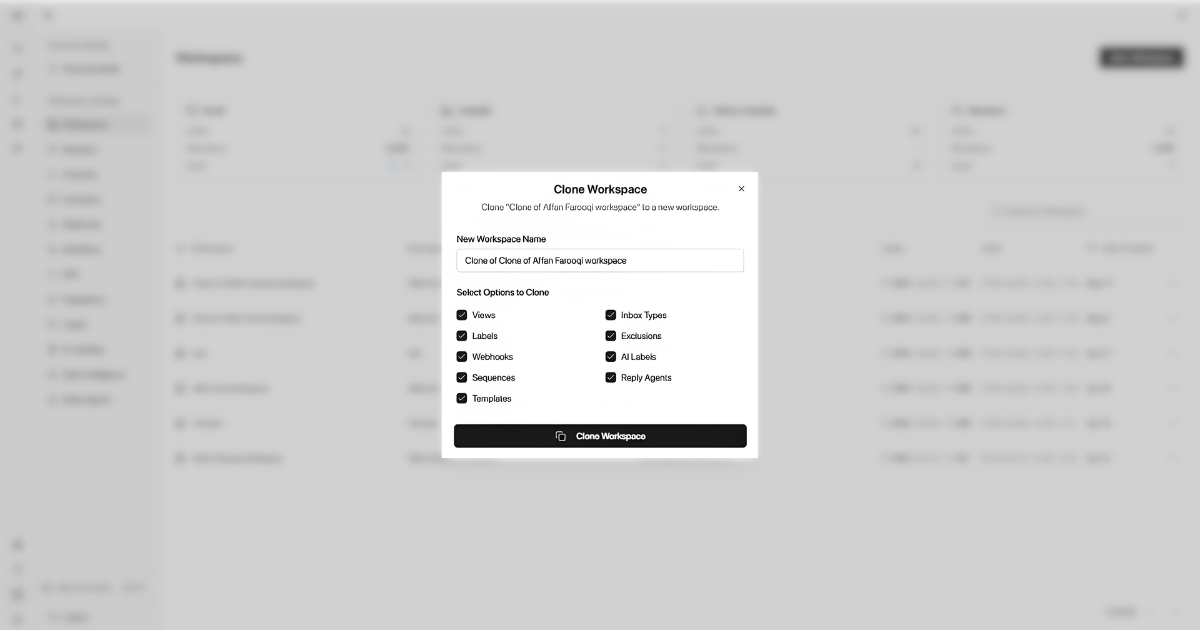
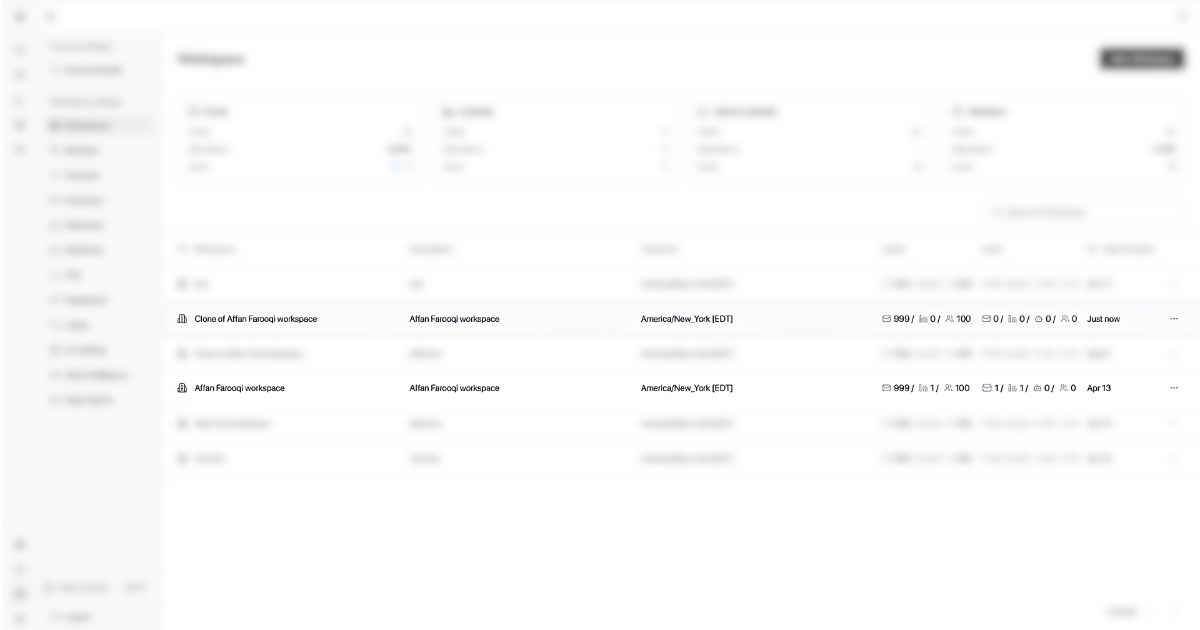
Click Create Workspace.
Your new workspace is ready with the same setup.
What Cloning Copies vs. Doesn't Copy
Cloning copies the structure and configuration of a workspace—its rules, views, and automation setup. It does not copy the actual content or connections.
Copied when selected
Views – Saved inbox views and filters
Labels – All labels and their rules
Webhooks – Webhook endpoints and settings
Inbox Types / Lists – Custom inbox categories
Exclusions – Exclusion rules and filters
AI Labels – AI-powered labeling rules
Reply agents – Agents and their configuration settings
Templates – Saved reply templates
Never copied
Messages – No conversation history
Conversations – No master threads or replies
Sender connections – No channels or mailboxes
Team members – No user access or permissions
Workspace limits – Limits reset to defaults
Important: Channels (email and LinkedIn connections) are never copied during a clone. The new workspace starts empty—you'll need to connect mailboxes and LinkedIn accounts separately. This is intentional to prevent data overlap between clients or teams.
Troubleshooting: Cloned Workspace Doesn't Look Right
If your cloned workspace is missing views, labels, or other elements, check these common issues:
Views or labels are missing
Check what you selected during clone. During the clone process, you chose which elements to copy. If you didn't select Views or Labels, they won't appear in the new workspace.
Re-clone if needed. You can clone the source workspace again and select the missing elements. Delete the incomplete workspace first to avoid confusion.
Channels or mailboxes didn't copy
This is expected behavior. Cloning never copies sender connections (channels). You must connect mailboxes and LinkedIn accounts manually in the new workspace.
Team members don't have access
Cloning doesn't copy team member access. You need to invite team members to the new workspace separately.
Webhooks or integrations aren't working
Review webhook endpoints. If webhooks point to external systems that expect a specific workspace ID, you may need to update those endpoints.
Reconnect integrations. Some integrations may require re-authentication or reconfiguration in the new workspace.
Workspace limits look wrong
Workspace limits reset to their default values when you clone. A super admin can update limits in Settings → Workspaces → Edit.
Steps to Switch a Workspace
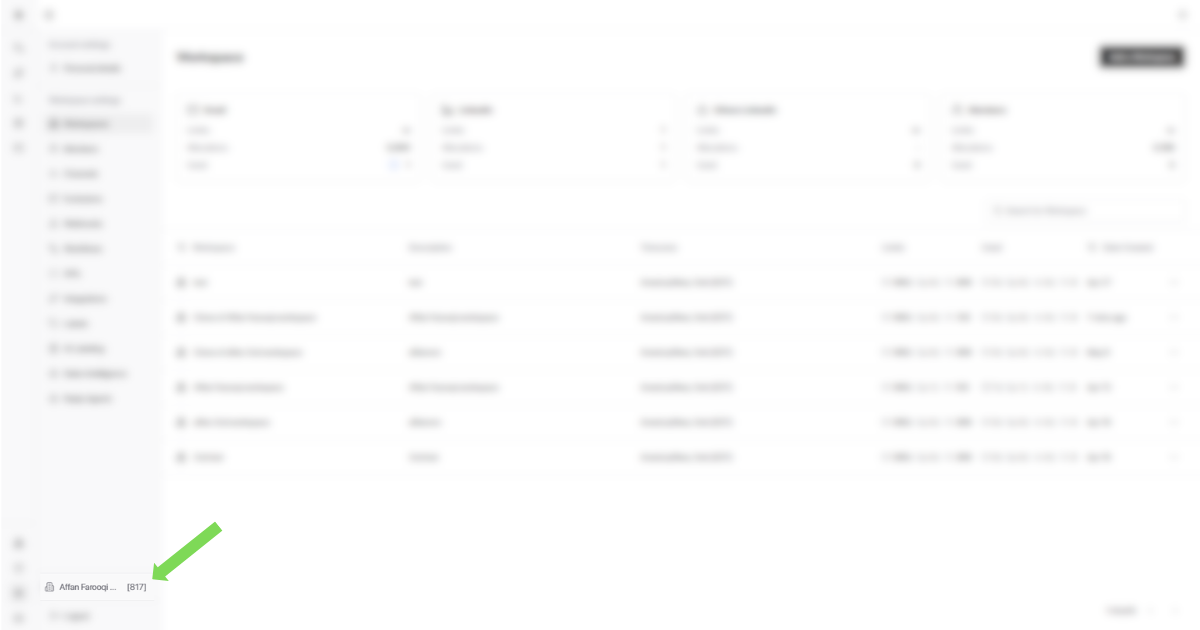
Look at the bottom-left corner of the app.
Click on your currently active workspace name (next to the Settings icon).
A list of available workspaces will open.
Click the workspace you want to switch to.
You're instantly moved into the selected workspace.
You can press W to open the workspace switcher, making it easy to jump between different teams or clients. Check Shortcuts to explore more keyboard shortcuts.
How to locate your Workspace ID
Your Workspace ID is a unique identifier for your workspace in Master Inbox. It appears directly in the app interface.
The ID is displayed as a number (e.g., 186) and is visible directly in the UI without navigating to Settings.
Frequently Asked Questions
What is a workspace in Master Inbox?
Can I create multiple workspaces?
Yes. You can create as many workspaces as you need. Agencies often create multiple workspaces—one per client or per project. Internal teams can create separate workspaces for different departments, regions, or campaigns.
Who should use separate workspaces?
Agencies: Create one workspace per client to keep conversations, reporting, and team access completely separate.
Internal teams: Create one workspace per sales team, GTM team, or region to maintain clean reporting and avoid inbox overlap.
Multi-brand companies: Use separate workspaces for each brand or product line.
How do I create a new workspace?
Go to Settings → Workspaces → Add Workspace. Enter your workspace name, description, timezone, and set your limits for emails, members, and LinkedIn accounts. Then click Create.
Can I change workspace settings after creation?
Yes. Go to Settings → Workspaces → Edit on the workspace you want to modify. You can update the name, description, timezone, and limits at any time. Only super admins can update workspace limits.
What are workspace limits?
Workspace limits control the maximum number of:
- Emails: Sender inboxes that can be connected
- Members: Users who can access this workspace
- LinkedIn Accounts: LinkedIn senders that can be connected (only applies to direct LinkedIn integrations, not Heyreach or API-based integrations)
Do workspace limits apply across all clients?
No. Each client account has its own independent pool of email slots, member slots, and LinkedIn account slots. Limits set for one client do not affect your account or other clients.
Who can update workspace limits?
Only the super admin (the billing account owner) can update workspace limits. Basic admins logged into client accounts cannot modify limits.
Why can't I see workspace settings or edit limits?
This usually means you're logged into a client account where you're a basic admin, not the super admin. Log out and log back in with the super admin account (the billing account) to access full workspace settings and update limits.
Can I set different timezones for different workspaces?
Yes. Each workspace has its own timezone setting, set by the workspace owner. This means you can have workspaces operating in different time zones—for example, one workspace for US East Coast teams and another for European teams.
What happens if I choose the wrong timezone?
The timezone affects timestamps, reminders, follow-ups, and reporting. If set incorrectly, scheduled activities may fire at the wrong times and reports may show misleading data. You can correct this anytime in Settings → Workspaces → Edit.
What does cloning a workspace do?
Cloning copies the structure and configuration of an existing workspace—not the messages or conversations. You can choose to clone views, labels, webhooks, inbox types/lists, exclusions, and AI labels. This saves time when setting up new clients or teams with similar workflows.
Does cloning copy messages and conversations?
No. Cloning copies only the configuration and rules—views, labels, webhooks, inbox types, exclusions, and AI labels. Messages, conversations, and sender connections are not copied to the new workspace.
When should I clone a workspace?
Clone a workspace when:
- You're onboarding a new client and want to reuse a proven setup
- You need to standardize workflows across multiple teams or clients
- You're creating regional or segment-specific workspaces with similar rules
- You want to test changes without affecting your live workspace
Can I choose what to clone in a workspace?
Yes. During the clone process, you can selectively choose which elements to copy: views, labels, webhooks, inbox types/lists, exclusions, and AI labels. This gives you control over exactly what setup carries over to the new workspace.
How do I switch between workspaces?
Click on your current workspace name in the bottom-left corner of the app (next to the Settings icon). A list of all available workspaces will appear. Click the one you want to switch to, and you'll be moved into that workspace instantly.
Can I work in multiple workspaces at the same time?
No. You can only be in one workspace at a time. To access content from another workspace, you must switch to it using the workspace selector in the bottom-left corner.
Where can I find my Workspace ID?
Your Workspace ID appears in the bottom-left corner of the app, next to the workspace name in the workspace list. It's displayed as a number (e.g., 186) and is visible directly in the UI without navigating to Settings.
Why is the Workspace ID important?
The Workspace ID is a unique identifier used for API integrations, webhooks, and third-party connections. When configuring external tools or troubleshooting integration issues, you may need to provide this ID to ensure data routes to the correct workspace.
What are the best practices for using workspaces?
For agencies: Create one workspace per client to keep conversations and reporting isolated. Use cloning to standardize setups across clients.
For internal teams: Create one workspace per sales or GTM team. Separate by region or product line if workflows differ.
General tips:
- Name workspaces clearly (Client Name / Campaign / Region)
- Set limits proactively to control access as you scale
- Create a "Template Workspace" for quick cloning
- Review webhooks and integrations after cloning
- Keep client-specific labels separate from global ones
Can agents and their configuration/settings be cloned?
Yes. When you clone a workspace and select Reply agents, the agents and their configuration settings are copied to the new workspace. This includes agent rules, labels, and any automation settings associated with each agent.
Why don't my channels or mailboxes appear after cloning?
Channels (email and LinkedIn connections) are never copied during a workspace clone. This is intentional—cloning copies the structure and rules, not the actual sender accounts or conversation data.
To connect channels in your cloned workspace:
Go to Settings → Channels in the new workspace
Click Add Channel and select the channel type
Follow the connection steps for Google, Outlook, LinkedIn, or IMAP/SMTP
See How to Add a Channel for detailed connection steps.
Why are my views or labels missing after cloning?
If views or labels didn't copy to your cloned workspace, check what you selected during the clone process:
During cloning, you chose which elements to copy (Views, Labels, Webhooks, etc.)
If you didn't select an element, it won't appear in the new workspace
To fix this, you can:
Delete the incomplete workspace and clone again, selecting the missing elements
Manually recreate the missing views or labels in the new workspace
Was this helpful?